WizzKoga Selector
Installing and using the WizzKoga Selector to switch up to six tank temperature sensors between one or two FizzWizz units.
The WizzKoga Selector removes the need to move temperature sensors from tank to tank. Up to six temperature sensors stay permanently installed in six conditioning tanks, and you choose which tank each FizzWizz reads by turning a selector knob.
Up to two FizzWizz units can be connected to one WizzKoga.
How it works
The WizzKoga is an electronic multiplexer. Each turn of a selector knob sends a code that switches which tank sensor is routed to that knob's FizzWizz.
| Control or indicator | Purpose |
|---|---|
| Left selector knob | Selects the tank connected to FizzWizz-1 |
| Right selector knob | Selects the tank connected to FizzWizz-2 |
| FizzWizz-1 LED (blue) | Identifies the colour used for FizzWizz-1 |
| FizzWizz-2 LED (orange) | Identifies the colour used for FizzWizz-2 |
| Tank 1 to 6 LEDs | Each tank has a pair of LEDs. A lit blue LED means that tank is connected to FizzWizz-1; a lit orange LED means it is connected to FizzWizz-2. |
A tank with no lit LED is not connected to either FizzWizz, even if a sensor is plugged into it.
Connections
| Connection | Location | Connects to |
|---|---|---|
| Tank temperature connections (×6) | Bottom edge | Temperature sensors in Tanks 1 to 6 |
| FizzWizz-1 temperature connection | Top edge | Temperature sensor port on FizzWizz-1 |
| FizzWizz-2 temperature connection | Top edge | Temperature sensor port on FizzWizz-2 |
| Power supply connection | Side, next to the FizzWizz-1 knob | Standard FizzWizz power supply |
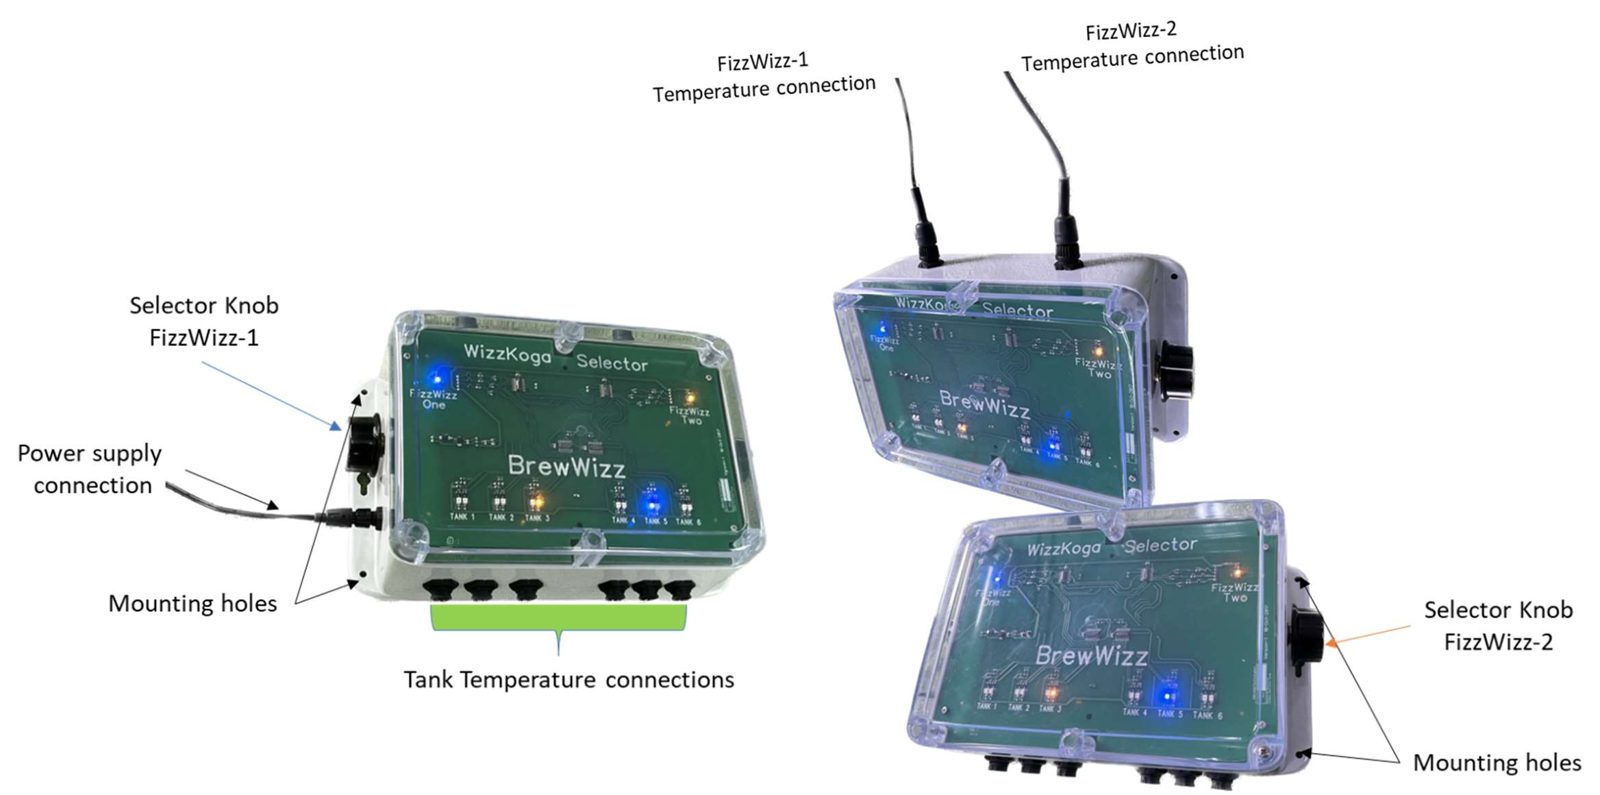
WizzKoga Selector connections, selector knobs, and mounting holes.
Installation
The WizzKoga must be powered. It won't pass any sensor signal to a FizzWizz without its own power supply.
Mount the WizzKoga
Permanently mount the WizzKoga below the FizzWizz unit or units, using the mounting holes on each side of the enclosure.
Connect the FizzWizz units
Using the cables provided, connect the FizzWizz-1 temperature connection to the temperature sensor port on your first FizzWizz. If you have a second FizzWizz, connect the FizzWizz-2 temperature connection to it.
Connect the tank sensors
Plug each tank's temperature sensor into the matching tank connection (Tank 1 to Tank 6). Unused tank connections can be left empty.
Connect power
Connect a standard FizzWizz power supply to the WizzKoga's power supply connection.
Selecting a tank
Turn the knob for the FizzWizz you want to change (left for FizzWizz-1, right for FizzWizz-2) until the LED for the tank you want lights in that FizzWizz's colour.
Example: two FizzWizz units, three sensors
Sensors are installed in Tanks 1, 4, and 6.
| Tank | LED | Connected to |
|---|---|---|
| Tank 6 | Blue | FizzWizz-1 |
| Tank 4 | Orange | FizzWizz-2 |
| Tank 1 | Off | Not connected |
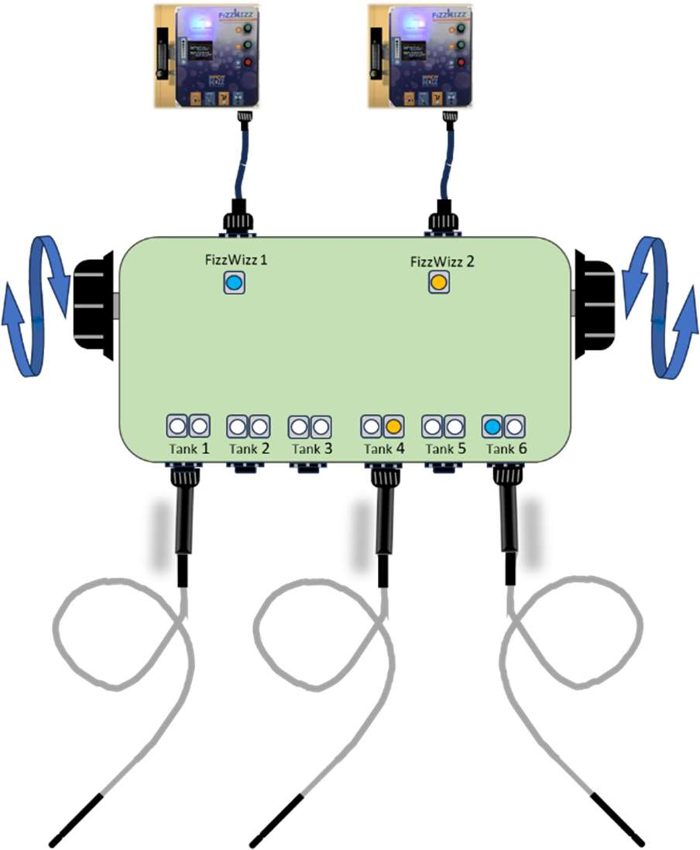
Tank 6 (blue) to FizzWizz-1, Tank 4 (orange) to FizzWizz-2, Tank 1 not connected.
Example: one FizzWizz unit, four sensors
Sensors are installed in Tanks 1, 2, 5, and 6, and only FizzWizz-1 is connected.
| Tank | LED | Connected to |
|---|---|---|
| Tank 2 | Blue | FizzWizz-1 |
| Tanks 1, 5, 6 | Off or orange | Not connected |
With no FizzWizz-2 attached, the orange FizzWizz-2 LEDs can be ignored. In this example Tank 5 shows orange, but nothing is reading it.
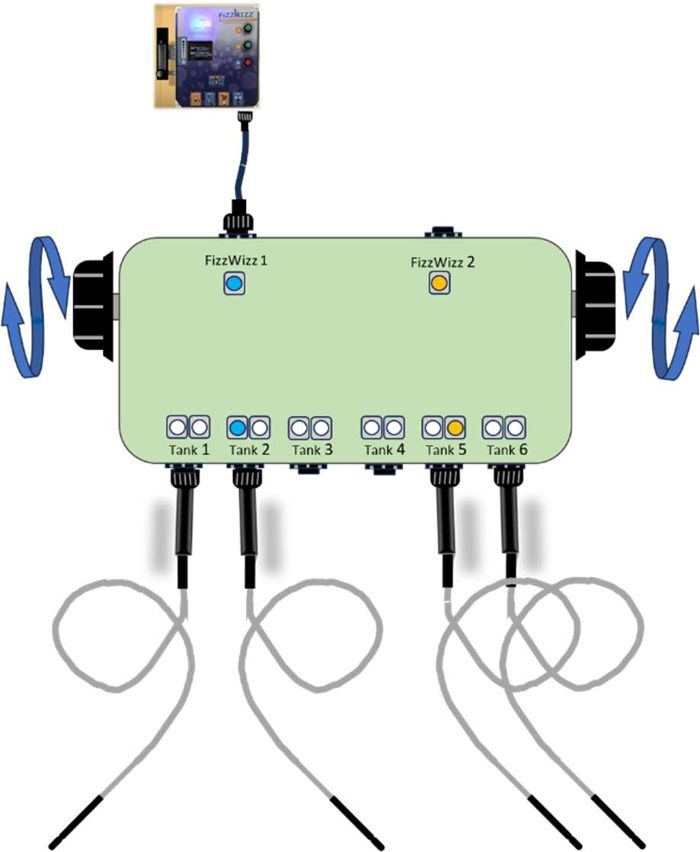
Tank 2 (blue) to FizzWizz-1. The orange LED on Tank 5 can be ignored because no FizzWizz-2 is connected.
Related
To check a temperature sensor once it is connected, see Slushy WizzTemp Test.